Using SSH keys
A SSH connection can be established using a password -the password of the user's account on the SSH host-. This is the basic setting, and it requires the user to enter the password on each access.
A more convenient approach can be achieved using SSH keys. Basically, a SSH key is generated, that includes in fact a pair of cryptographic keys -a public encryption key and a private decryption key. The public one is transferred to any host where a SSH session is required. The private one remains on the client machine or machines, and the user should ensure its security. If correctly setup, the user can now access all the servers without introducing any passwords. Definitely very convenient.
There are many configurations possible to enable SSH keys. On the client side, the default configuration requires:
-
To have, on each account supporting a SSH connection, a ~/.ssh folder that must be chmod 700: that is, only accessible by the account's owner.
-
To store on this folder the SSH key, named id_rsa (will be named id_dsa if the SSH key's type is DSA). Furthermore, this file must be chmod 600: that is, only accessible by the account's owner.
The command
ssh-keygen -t rsa -b 4096
achieves these requirements, producing a 4096 bits RSA key: it creates by default the file ~/.ssh/id_rsa with the right permissions, and, if missing, it creates also the ~/.ssh folder, chmodded to 700. When this command is executed, the user is prompted to enter a passphrase: although is not mandatory to introduce one, it is sensible to have one in most cases.
In fact, the ssh-keygen creates two files: ~/.ssh/id_rsa, the private key, and ~/.ssh/id_rsa.pub, that is the public key. This public key can be sent to as many hosts as required -no security concerns here-.
On the server side, the default configuration requires:
-
To have, on each account supporting a SSH connection, a ~/.ssh folder that must be chmod 700: that is, only accessible by the account's owner.
-
To store on this folder a file called authorized_keys, also chmod 600. This file contains each accepted public key, one per line. The format of this file allows to specify options associated to each key, to restrict the associated SSH connection or to perform specific actions when the connection is established.
So, very basically, the process is:
-
If you still have no SSH key, create one -using ssh-keygen-, and store the private key as ~/.ssh/id_rsa on the client machine or machines.
-
Include the public key in the file ~/.ssh/authorized_keys of each account and server where it is required the SSH connection:
cat id_rsa.pub >> ~/.ssh/authorized_keys
-
Ensure that the permissions are correct: chmod 700 on the ~/.ssh folder, and chmod 600 on the folder's files.
Once this setup is in place, the exact behaviour depends on the particular linux distribution. The objective is to issue the SSH connection command and not to have to enter the passphrase on each attempt. This can be achieved, of course, by using SSH keys without passphrase, which is difficult to recommend on most scenarios. The alternative is based on the ssh_agentimplementation, that provides a secure way of handling the passphrase(s). In OsX, the ssh-agent is integrated with the keychain, so each time the passphrase is required, the Keychain will check if it already knowns the passphrase. If not, a dialog will appear, looking as:
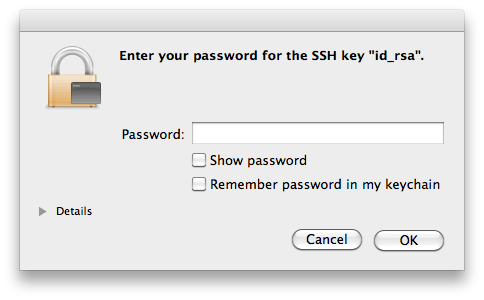
So, the first time the SSH access is required, the Keychain mechanisms in Os X will kick in, presenting that dialog. If the password is added to the keychain, it will not be requested any longer: objective achieved.
Similar mechanisms exist in linux, like the KWallet in KDE or the GNOME keyring. From the command line is definitely possible handling the SSH certificates:
ssh-add
Adds the private key to the keyring, asking for the passphrase if the key has one. This command requires to have the ssh-agent running -and the environment variable SSH_AUTH_SOCK correctly setup, but this will normally be the case (otherwise, starting ssh-agent automatically displays the required environment variables to set).
It is also possible to add the keys to the ssh-agent automatically on each session, just by adding to your ~/.xsession file the line ssh-add, although this requires to have the ssh-askpass package installed.
ssh-agent: use it
So, to be able to so SSH connections without entering each time a password, it is needed to use SSH keys. And to use SSH keys without entering a passphrase, it is needed to use the ssh-agent (or Keychain in OsX). And the result is not only a higher convenience, but an increased security. Quoting from this weblog entry: when you authenticate to a text-based channel on a remote server, you should never have to type anything about that authentication into the channel that will eventually be controlled by the remote server.
Of course, the security is only increased if some conditions are met: once the keyring is accessible, anybody with access to the login session can reach the SSH servers without entering any passwords or passphrase. For example, a laptop with sensible SSH login keys should remain always secure -blocking sessions on standby, or after some idle time-.
Multiple SSH keys
In principle, there is need for one single SSH key. But although it is overkilling having multiple keys for multiple services or hosts, like, for example, one for each subversion or git repository's server, there are still many scenarios where having multiple keys is the most sensible action.
One such scenario is to configure a SSH key without a passphrase to permit automation of operations over SSH, but most commonly is due to security concerns: a laptop could use a key that has granted access to only a subset of all the services or servers, or with granted access to accounts with lower permissions.
To generate SSH keys on specific files, the flag -f is used on ssh-keygen:
ssh-keygen -t rsa -b 4096 -f KEYS_FILE -C COMMENT
The generated public key is added to the servers in the same way; the ~/.ssh/authorized_keys file in the server can have multiple keys associated to the same client. For the client to use this new key instead of the default one, it must do so explicitly, and the way to do so depends in fact on the used tool. To open a SSH connection using ssh:
ssh -i KEYS_FILE user@host
Or just using an alias:
alias ssh="ssh -i KEYS_FILE"
If the key is used for a subversion access via SSH, an environment variable can be set:
export SVN_SSH="ssh -i KEYS_FILE user@host"
It is also possible to configure SSH to directly use multiple keys, by providing a file ~/.ssh/config. This file can contain multiple entries such as:
IdentityFile ~/.ssh/id_rsa.home
IdentityFile ~/.ssh/id_rsa.work
Now, both keys are used all the time; even better, it is possible to define the key selection based on the server, like:
Host *.coderazzi.net
 IdentityFile ~/.ssh/id_rsa.coderazzi

Host *.coderazzi.com
 IdentityFile ~/.ssh/id_rsa.coderazzi.com
 User coderazzi

Host *.codingnight.net
 IdentityFile ~/.ssh/id_rsa.cn
 User coderazzi
 Port 5623
Maintenance
SSH keys maintenance includes the change of passphrases, and the renewal of keys
For the same reasons that it is recommended to change periodically your account's password[s], the passphrases in the SSH keys should be also periodically changed, using the flag -p on ssh-keygen:
ssh-keygen -p [-f KEYS_FILE]
Changing the passphrase does not impact the public key, it only changes the private key. So, if there are reasons to believe that the private key is compromised, changing the passphrase is definitely not enough: new keys should be generated, and the existing public key replaced on all related servers.
Core stuff
This small tutorial covers only the basic of making a default SSH setup work on Linux or OsX. The very basics. There are related concepts like the known_hosts file, xauth, restricting ssh commands, using different SSH protocol versions, etc, etc, etc.
Why do I want to use public key authentication?
Passwords aren't the most secure things in the world. Even if a user picks a 'secure' password that's stronger than their dog's name, the password is still susceptible to a brute-force attack. Brute force attacks via ssh against user passwords are quite common on the Internet and several prevalent worms and zombies perform automated attacks incessantly against any internet-connected host. Even a secure password is at risk to these attacks, done by hand or by worm. Allowing password access to a system with many users is an invitation for a security breach.
 Additionally, if you've got accounts on a large number of hosts it's tempting to reuse the same password on more than one host to reduce the number of passwords that your fingers have to memorize. Each shared password on a remote system puts you more at risk of a brute force attack on that host's password file, and means that if one host is compromised that all your other hosts sharing that same password are significantly less safe. Heck, you could accidently "erp" your password into an IRC channel by mistake some day and then spend the rest of the afternoon finding all the systems where you've re-used that password so that you can change it before anyone figures it out. It's not fun (or so I've heard!) Thankfully, there's a solution! OpenSSH has a robust and well-tested public key authentication system built right in. When set up properly, it's not only more secure than using passwords but it's also a lot easier to use. How often does that happen?
What does public key mean, exactly?
Public-key authentication (or PKI -- a public key infrastructure) is an authentication method that relies on a generated public/private keypair. With PKI a special "key" is generated which has a very useful property: Anyone who can read the public half of the key is able encrypt data which can then only be read by a person who has access to the private half of the key. In this way, having access to the public half of a key allows you to send secret information to anyone with the private half, and to also verify that a person does in fact have access to the private half. It's easy to see how this technique could be used to authenticate.
 As a user, you can generate a keypair and then place the public half of the key on a remote system. That remote system is then able to authenticate you, or prove that you are really you, and allow you to login just by having you demonstrate that you have access to the private half of the keypair. This is done at the protocol level inside SSH and happens automatically.
 It does, however, mean that you need to protect the privacy of the private key. On a shared system where you do not have root this can be accomplished by encrypting the private key with a passphrase, which functions similarly to a password. Before SSH can read your private key in order to perform the public key authentication you'll be asked to supply the passphrase so that the private key can be decrypted. On more secure systems (like a machine where you are the only user, or a machine at your home where no strangers will have physical access) you can simplify this process either by creating an unencrypted public key (with no passphrase) or by entering your passphrase once and then caching the key in memory for the duration of your time at the computer. OpenSSH contains a tool called ssh-agent which simplifies this process.
How do I set this up?
The first thing you need to do is generate a keypair using the ssh-keygen tool which is part of OpenSSH. Windows users who use PuTTY can use the related putty-keygen.exe program in the same manner. SecureCRT has a keypair generator built in as well. Here's a log of creating a keypair:
luser@localhost:~$ ssh-keygen -t dsa
 Generating public/private dsa key pair.
 Enter file in which to save the key (/home/luser/.ssh/id_dsa):
 Enter passphrase (empty for no passphrase):
 Enter same passphrase again:
 Your identification has been saved in /home/luser/.ssh/id_dsa.
 Your public key has been saved in /home/luser/.ssh/id_dsa.pub.
 The key fingerprint is:
 f3:77:56:58:a8:bb:08:59:67:15:2c:0e:1d:d0:40:a3 luser@example.com
 luser@localhost:~$
Now you have the two halves that comprise a keypair. The file id_dsa is the private half and the file id_dsa.pub is the public half. You'll want to make sure that only you can read the private files. This is critical, because OpenSSH will refuse to work with key files which are world or group readable. Verify thusly:
luser@localhost:~$ chmod 700 $HOME/.ssh
 luser@localhost:~$ chmod 600 $HOME/.ssh/id_dsa*
 luser@localhost:~$ ls -la .ssh
 total 10
 drwx------   2 luser  luser   512 Nov 15 16:12 .
 drwx-----x  12 luser  luser  1024 Jun 24  2004 ..
 -rw-------   1 luser  luser  1264 Nov 15 16:12 id_dsa
 -rw-------   1 luser  luser  1123 Nov 15 16:12 id_dsa.pub
 luser@localhost:~$
So now we're half-way there. You've got your keypair but we need to place the public half of the key on a remote machine. If you look at the id_dsa.pub file in your favorite editor you'll see that it's just a big block of numbers and letters. This means that it's easy enough to cut and paste, which can be simpler than trying to send it to a remote machine using a file transfer protocol like sftp or scp. Usually it's easiest to just open up another terminal window and paste it to the other host. In either case, you'll want to take the contents of id_dsa.pub and stuff them into a file named $HOME/.ssh/authorized_keys on a remote host. As before, make sure that the .ssh directory is only readable by you (chmod 700) and that the authorized_keys file is as well (chmod 600). You should end up with something like this:
luser@remotehost:~$ls -la .ssh
 total 16
 drwx------  2 luser  luser   512 Jul 11 19:01 .
 drwx--x--x  7 luser  luser  1024 Nov 14 18:01 ..
 -rw-------  1 luser  luser  1123 Nov 15 16:21 authorized_keys
So now you're all set to log in using public key authentication. Instead of being asked for your password on remotehost, you'll instead be challenged for the passphrase you've used to encrypt your local, private key. Give it a shot:
luser@localhost:~$ssh remotehost.example.com
 Enter passphrase for key '/home/luser/.ssh/id_dsa':
 Last login: Tue Nov 15 16:20:50 2005 from localhost.example.com
luser@remotehost:~$
That's all there is to it! In reality, the user account on the remotehost side doesn't even need to have a password. With no password (which is not the same as a NULL password) it's not even possible to log in to a remote system without the private key. This makes the account totally immune to a brute-force password attack. There are other benefits as well, though. You can actually have more than one public key placed into the authorized_keys file on a remote host. This means that you can generate more than one private key if you routinely ssh from multiple locations. For example, you might create separate keypairs for your computer at home and the computer at your office. Remote hosts might have just one or both of those keys in the authorized_keys file. You might create a third keypair for your work laptop.
 Why would you want multiple keys? Well imagine if your laptop gets lost or stolen. You can simply log in to remote hosts and remove that specific public key from your authorized_keys files and the laptop will be rendered incapable of logging in to the remote hosts, even if someone manages to crack or guess the passphrase which protects the private key. In this way, it's simple to "revoke" a keypair.
 You'll also find that you're no longer tempted to share a single password with multiple remote hosts, which yields a dramatic increase in your overall security because if an account is compromised on one remote host it cannot be linked to any of your other accounts on other hosts.
Advanced usage: ssh agent
You can actually take public key authentication one step further and make your life even easier by caching your private key locally. OpenSSH contains a tool called "ssh-agent" which can be used to accomplish this. This provides a compromise between the easy use of a passphrase-less private key and the security of having your private key encrypted in case someone gains unauthorized access to the actual file. You run ssh-agent on the local machine where you're sitting, and use it to cache the private key for repeated use.
 The key to using ssh-agent is launching it as the parent process to your user session itself. Many Unixes are already doing this for you, and if you check your process list you may find that ssh-agent is already running to provide this capability. Windows users using PuTTY can use PuTTY's "pagaent.exe" tool and Mac OS X users can download a third party tool like SSHKeyChain or use the command-line ssh-agent as they would with any other Unix. [Edit: OS X 10.5 "Leopard" has ssh agent support built in. You don't need to install any additional software if you're running Leopard] If your operating system isn't running ssh-agent for you, you'll want to invoke it as part of your login process. For example, you might change your gdm or xdm login to invoke "ssh-agent gnome-session" instead of just "gnome-session" so that ssh-agent can sit on top of your session. The key is making sure that the SSH_AUTH_SOCK and SSH_AGENT_PID environment variables are global to your sessions on the host. With ssh-agent resident, you can run it manually and store your private key inside with ssh-add:
luser@localhost:~$ ssh-add ~/.ssh/id_dsa
 Need passphrase for /home/luser/.ssh/id_dsa (luser@example.com).
 Enter passphrase:
 luser@localhost:~$
After having done that, you should now be able to ssh to any remote host without being challenged for your passphrase. OpenSSH will talk to the local ssh-agent daemon and retrieve the private key from it automatically. That authentication can even be (optionally) tunneled to the remote host which means if you ssh hop from that remote host to yet a third host the authentication can pass back through to your local ssh-agent and still not require typing a password or passphrase.
 Be aware that using ssh-agent puts your private key at risk to anyone who has root access on the machine where ssh-agent is. It's not wise to use ssh-agent on a machine where you aren't or don't trust the administrator. It's also not wise to allow OpenSSH to forward the authentication on to a machine where you aren't or don't trust the administrator. You can control whether or not this agent forwarding takes place using the command line:
-A    Enables forwarding of the authentication agent connection.  This
 can also be specified on a per-host basis in a configuration
 file.
Agent forwarding should be enabled with caution.  Users with the
 ability to bypass file permissions on the remote host (for the
 agent's Unix-domain socket) can access the local agent through
 the forwarded connection.  An attacker cannot obtain key material
 from the agent, however they can perform operations on the keys
 that enable them to authenticate using the identities loaded into
 the agent.
-a Disables forwarding of the authentication agent connection.
or by defining it the $HOME/.ssh/config file like this:
#
 # .ssh/config file for luser@localhost
 #
# Forward X11 and Auth to slacker.com hosts, they can be trusted
 Host *.slacker.com
 ForwardAgent              yes
 ForwardX11                yes
# Forward X11 and Auth to my trusted example.com hosts
 Host *.example.com
 ForwardAgent              yes
 ForwardX11                yes
# All hosts which haven't been matched above, paranoid settings
 Host *
 ForwardAgent              no
 ForwardX11                no
 Compression               yes
 KeepAlive                 yes

